A Plague of Skeletons
| A Plague of Skeletons | ||
| Campaign: Act 1, Mission 2 | ||
 | ||
| The Felheim invasion begins in earnest. | ||
| Objectives | ||
| Neutralise all enemy structures. | ||
| Structures | ||
| Information | ||
| Map Type: | Campaign | |
| Fog of War: | No | |
| Reward Stars: | ||
| S-Rank: | 11 Turns | |
| Unlocks | ||
| Felheim codex entry | ||
| Previous Map |
Next Map | |
| ❮ The Breach |
Worst Enemies Forever ❯ | |
A Plague of Skeletons is the 2nd mission in Act 1 of the single player campaign.
You play as Mercia commanding soldiers defending against Ragna's army to reclaim land from Felheim.
This mission functions as a tutorial to Archers, capturing buildings, and recruiting units from barracks.
Objective[edit]
Victory: Neutralise all enemy structures.
Defeat: Lose control of the barracks.
Completion Rewards[edit]
| Rank | Turn Requirement | Rewards |
|---|---|---|
| E | ||
| D | 24 | |
| C | 20 | |
| B | 15 | |
| A | 13 | |
| S | 11 |
Unlocks[edit]
- Lore for Felheim in the codex.
- Access to Act 1: Mission 3, Worst Enemies Forever.
Map[edit]

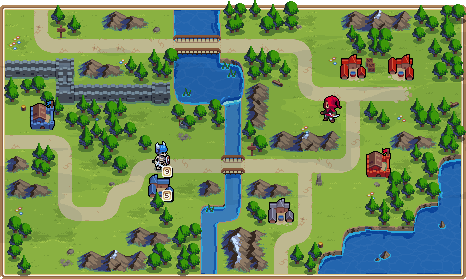
Alongside the barracks and initial soldier, Ragna will also receive an additional 2 soldiers from the North on Turn 4.
Story[edit]
8th June, The Greensweep
With Felheim's invasion underway, Mercia travels to reclaim land being controled by Felheim. However, she encounters Ragna, a Felheim commander, who challenges to fight Mercia.
Mercia quickly deals with Ragna. However, Ragna does not simply accept defeat, and seeks to fight Mercia again.
Strategy[edit]
Community Guides[edit]
| Title | Author | Date | Link | Additional notes |
|---|---|---|---|---|
| Wargroove [Switch] - Act 1 Walkthrough - S Rank | D4veY's Guides | 5 February 2019 | YouTube | Outdated (Version 1.3) |
| Wargroove - THE COMPLETE S-RANK GUIDE | horheristo | 13 February 2019 | YouTube | Outdated (Version 1.3) |
| Kitsune's Campaign S Rank Strategies and Walkthroughs | Kitsune (AKA ophelia arcadia) |
27 December 2019 | Steam Community | Outdated (Version 1.3) Includes videos |
| Wargroove Walkthrough and Guide | Haeravon | 10 March 2019 | neoseeker | Outdated (Version 1.3) |
Wiki Guides[edit]
| Simple strategy |
|---|
|
Hint: Use abundent Spearmen This mission is simple so long as you continuously build units. It is best to move the archer west across the river. This will prevent the unit falling into enemy range, while able to attack the Soldiers that appear from the north with an easy Critical Hit. After this, only a single spearman will eventually be needed to go North to defend. By moving spearman across, and keeping the healthiest units at the front (and using the weakened ones to set up Critical Hits), it is easy to follow the road up to the enemy barracks, while using the Archer through the forest to attack any enemies that appear. Once close, a Critical Hit on the Barracks from a healthy Spearman, and a shot from the Archer will be enough to finish the battle. |
Dialogue[edit]
Introduction dialogue
![]() Did you see that? The Felheim hordes just captured a Village to the west.
Did you see that? The Felheim hordes just captured a Village to the west.
![]() They'll attempt to claim the neutral Village to the east next unless we stop them.
They'll attempt to claim the neutral Village to the east next unless we stop them.
![]() Luckily, a Cherrystone Ranger is here to help us.
Luckily, a Cherrystone Ranger is here to help us.
![]() Rangers are units that can attack enemies from a distance.
Rangers are units that can attack enemies from a distance.
![]() Let's move it into a position from where it can attack any approaching undead.
Let's move it into a position from where it can attack any approaching undead.
- (Move Ranger)
![]() From this position, our Ranger can attack any enemies approaching from the west.
From this position, our Ranger can attack any enemies approaching from the west.
![]() When you want to end your turn, select an unoccupied map tile and then select 'End Turn'.
When you want to end your turn, select an unoccupied map tile and then select 'End Turn'.
Start of Mercia's turn 2
![]() Are you remembering to check the Unit Info screen to learn about Critical Hits?
Are you remembering to check the Unit Info screen to learn about Critical Hits?
![]() Good! Then you'll know that Rangers Crit if they attack without moving.
Good! Then you'll know that Rangers Crit if they attack without moving.
![]() We'll attack the Dreadsword without moving the Ranger now.
We'll attack the Dreadsword without moving the Ranger now.
- (Kill Dreadsword)
![]() We may have defeated those soldiers, but it's not over yet.
We may have defeated those soldiers, but it's not over yet.
![]() The enemy owns a Barracks. This will enable them to recruit new units.
The enemy owns a Barracks. This will enable them to recruit new units.
![]() Fortunately, we have access to a Barracks of our own!
Fortunately, we have access to a Barracks of our own!
![]() We should select it to recruit a new unit at once.
We should select it to recruit a new unit at once.
- (Select Barracks)
![]() This Barracks lets you recruit three different unit types.
This Barracks lets you recruit three different unit types.
![]() Swordsmen, Pikemen and Rangers!
Swordsmen, Pikemen and Rangers!
![]() That's right. But due to our current funds...
That's right. But due to our current funds...
![]() ...I can only afford a Swordsman right now.
...I can only afford a Swordsman right now.
![]() A single Swordsman can make a big difference. Let's recruit one now.
A single Swordsman can make a big difference. Let's recruit one now.
- (Recruit Swordsman)
![]() Note that each Barracks can only recruit a single unit per turn.
Note that each Barracks can only recruit a single unit per turn.
![]() Right. I'll make sure to remember that.
Right. I'll make sure to remember that.
Start of Mercia's turn 3
![]() Select our new Swordsman and order it to move and capture the Village.
Select our new Swordsman and order it to move and capture the Village.
- (Capture Village)
![]() Villages bring in 100 gold every turn, so they're incredibly important to the war effort.
Villages bring in 100 gold every turn, so they're incredibly important to the war effort.
![]() Right! Because more gold means we can recruit more units.
Right! Because more gold means we can recruit more units.
![]() Correct. In fact, we can cripple the enemy's income by taking their Village to the west.
Correct. In fact, we can cripple the enemy's income by taking their Village to the west.
![]() To capture a Village that is owned by a different faction, we must first defeat it.
To capture a Village that is owned by a different faction, we must first defeat it.
![]() Then I'll recruit more units straight away and order them towards that Village.
Then I'll recruit more units straight away and order them towards that Village.
- (Select Barracks)
![]() Some units are more effective than others at defeating structure such as Villages.
Some units are more effective than others at defeating structure such as Villages.
![]() I advise you to rely on the Pikeman's powerful Crit for this job.
I advise you to rely on the Pikeman's powerful Crit for this job.
![]() Alright! I'll recruit Pikmen and send them towards the enemy Village.
Alright! I'll recruit Pikmen and send them towards the enemy Village.
Start of Mercia's turn 4
![]() Enemy reinforcements to the north!
Enemy reinforcements to the north!
![]() They'll no doubt be heading towards your northern Villages.
They'll no doubt be heading towards your northern Villages.
![]() I should've known they wouldn't make this easy for us.
I should've known they wouldn't make this easy for us.
![]() I suggest you don't leave the northern path unattended.
I suggest you don't leave the northern path unattended.
![]() I'll make sure to leave a unit to protect the northern Villages.
I'll make sure to leave a unit to protect the northern Villages.
Upon defeating enemy Village:
![]() Excellent. You've cleared the enemy from the Village.
Excellent. You've cleared the enemy from the Village.
![]() You should capture it to secure it before Ragna takes it back.
You should capture it to secure it before Ragna takes it back.
Upon capturing Western Village
![]() Well done! With no Villages, the enemy has no income.
Well done! With no Villages, the enemy has no income.
![]() You'll notice that a captured structure never begins with full health.
You'll notice that a captured structure never begins with full health.
![]() In fact, it starts with the equivalent of half the capturing unit's health.
In fact, it starts with the equivalent of half the capturing unit's health.
![]() So if a unit with 40% health captures a Village, the Village starts with 20% health?
So if a unit with 40% health captures a Village, the Village starts with 20% health?
![]() Yes! Now, we should destroy their Barracks to completely remove them from this region.
Yes! Now, we should destroy their Barracks to completely remove them from this region.
Start of Ragna's turn when she has no gold (First time)
![]() WHAT?! I don't have enough gold to recruit a new unit?!
WHAT?! I don't have enough gold to recruit a new unit?!
Start of Ragna's turn when she has no gold (Looped 1)
Start of Ragna's turn when she has no gold (Looped 2)
Start of Ragna's turn when she has no gold (Looped 3)
Upon defeating enemy Barracks
Mercia's Barracks are defeated
![]() Oh no, the Barracks! I should have kept a few units behind to protect it!
Oh no, the Barracks! I should have kept a few units behind to protect it!