Worst Enemies Forever
| Worst Enemies Forever | ||
| Campaign: Act 1, Mission 3 | ||
 | ||
| Unhappy with her defeat, Ragna decides to take matters into her own hands. | ||
| Objectives | ||
| Destroy the enemy Stronghold or defeat Ragna! | ||
| Structures | ||
| Information | ||
| Map Type: | Campaign | |
| Fog of War: | No | |
| Reward Stars: | ||
| S-Rank: | 7 Turns | |
| Unlocks | ||
| Ragna additional lore | ||
| Previous Map |
Next Map | |
| ❮ A Plague of Skeletons |
Lord of the Dead ❯ | |
Worst Enemies Forever is the 3rd mission in Act 1 of the single player campaign.
You play as Mercia battling Ragna after she demanded a rematch, following her previous defeat.
This mission functions as a tutorial to reinforcement, cavalry, commanders, and strongholds.
Objective[edit]
Victory: Destroy the enemy Stronghold or defeat Ragna.
Defeat: Mercia is defeated.
Completion Rewards[edit]
| Rank | Turn Requirement | Rewards |
|---|---|---|
| E | ||
| D | 15 | |
| C | 13 | |
| B | 10 | |
| A | 8 | |
| S | 7 |
Unlocks[edit]
- Pages 3 to 5 for Ragna's bio in the codex.
- Access to Act 1: Mission 4, Lord of the Dead.
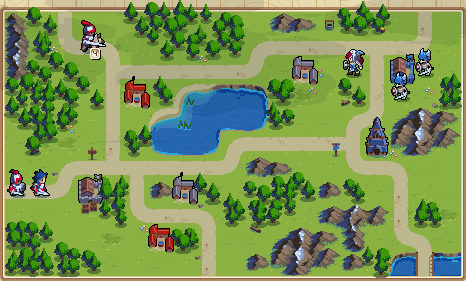
Map[edit]

Story[edit]
9th June, Sage Woods
Following her unceremonious defeat, Ragna returns the next day to fight Mercia head-on once more.
Defeated once more, Mercia leaves her to wallow in her frustrations. Valder, the ruler of Felheim arrives. Seeing Ragna's failures, he aim to attend to Mercia himself.
Strategy[edit]
Community Guides[edit]
| Title | Author | Date | Link | Additional notes |
|---|---|---|---|---|
| Wargroove [Switch] - Act 1 Walkthrough - S Rank | D4veY's Guides | 5 February 2019 | YouTube | Outdated (Version 1.3) |
| Wargroove - THE COMPLETE S-RANK GUIDE | horheristo | 13 February 2019 | YouTube | Outdated (Version 1.3) |
| Kitsune's Campaign S Rank Strategies and Walkthroughs | Kitsune (AKA ophelia arcadia) |
27 December 2019 | Steam Community | Outdated (Version 1.3) Includes videos |
| Wargroove Walkthrough and Guide | Haeravon | 10 March 2019 | neoseeker | Outdated (Version 1.3) |
Wiki Guides[edit]
| Simple strategy |
|---|
|
Hint: Focus on one lane with both Mercia and your free Cavalry This is the first mission you have freedom in how you strategise your army, with different options for getting an S-rank. The easiest route to victory is the southern lane towards the stronghold. Do not worry too much about leaving a lane unprotected, Ragna will rarely send units away from the fight, and a single Pikeman should be enough to deal with stragglers. Instead, focus your efforts on getting Mercia and the Cavalry to the stronghold for a clean victory. Regardless of your path, you will want to place both Mercia and your free Cavalry on your chosen path. Your goal should be to get a Critical Hit with the cavalry on the stronghold, on a side where it is unlikely enemies will attack the cavalry so it can destroy the stronghold next turn. This is significantly less trouble than trying to defeat Ragna, as Ragna will retreat when injured, making her sometimes difficult to reach. If Mercia or the Cavalry is injured before you can go for the Stronghold, make sure to Reinforce off the nearest available Village. An injured unit is not much use to you. That said, do not be afraid to place Mercia in the path of soldiers, she will destroy them extremely easily, but try to avoid letting Ragna get the first hit on Mercia, as this will severely injure her. |
Dialogue[edit]
Introduction dialogue
![]() Ragna has moved deep into this region. She's even got a Stronghold.
Ragna has moved deep into this region. She's even got a Stronghold.
![]() A Stronghold is a really important structure that anchors a faction to a region.
A Stronghold is a really important structure that anchors a faction to a region.
![]() To win, we can either defeat the Stronghold or Ragna herself.
To win, we can either defeat the Stronghold or Ragna herself.
![]() I understand. I'm joining this fight personally!
I understand. I'm joining this fight personally!
![]() Look! Over there! One of our Knights has beaten us here.
Look! Over there! One of our Knights has beaten us here.
![]() Knights are strong, fast-moving units.
Knights are strong, fast-moving units.
![]() However, they're unable to capture structures. Only infantry and Commanders can do that.
However, they're unable to capture structures. Only infantry and Commanders can do that.
![]() Knights sound great. Let's get started!
Knights sound great. Let's get started!
![]() Hold your horses - it seems this Knight is low on health.
Hold your horses - it seems this Knight is low on health.
![]() Is there something we can do to help?
Is there something we can do to help?
![]() Indeed there is. This is where Reinforcement comes into play.
Indeed there is. This is where Reinforcement comes into play.
![]() Simply move a wounded unit next to one of your structures and select 'Reinforce'.
Simply move a wounded unit next to one of your structures and select 'Reinforce'.
![]() Sadly, structures are unable to regain health through Reinforcement.
Sadly, structures are unable to regain health through Reinforcement.
![]() However, their health will gradually be restored over time - as will that of certain units.
However, their health will gradually be restored over time - as will that of certain units.
![]() All structures regain 10% health every turn...
All structures regain 10% health every turn...
![]() And all commanders, such as yourself, regain 5%.
And all commanders, such as yourself, regain 5%.
- (Reinforce Knight)
![]() Excellent! Our Knight's back to full health!
Excellent! Our Knight's back to full health!
![]() Yes! Though it's important to note that reinforcing has its drawbacks.
Yes! Though it's important to note that reinforcing has its drawbacks.
![]() First, reinforcing a unit costs an amount of gold proportional to the unit's value.
First, reinforcing a unit costs an amount of gold proportional to the unit's value.
![]() And second, the health restored to the unit is taken from the health of the structure.
And second, the health restored to the unit is taken from the health of the structure.
![]() Got it - reinforcement costs gold, and transfers health from the structure.
Got it - reinforcement costs gold, and transfers health from the structure.
![]() Okay, I should start by taking control of these Barracks and nearby Villages.
Okay, I should start by taking control of these Barracks and nearby Villages.
Start of Mercia's turn 2
![]() As Commanders, you and Ragna are both powerful units on the battlefield.
As Commanders, you and Ragna are both powerful units on the battlefield.
![]() You can easily take down most infantry units and enemy structures single-handedly.
You can easily take down most infantry units and enemy structures single-handedly.
![]() Make the most of your strengths as a Commander, without risking your neck.
Make the most of your strengths as a Commander, without risking your neck.
![]() Remember, the team that loses their Commander also loses the battle.
Remember, the team that loses their Commander also loses the battle.
Start of Mercia's turn 3
![]() Ragna just recruited a Dreadspear - a Felheim Spearman.
Ragna just recruited a Dreadspear - a Felheim Spearman.
![]() It would be prudent to check the Spearman's Info Screen.
It would be prudent to check the Spearman's Info Screen.
- (Open Dreadspear info)
![]() Let me direct your attention to the table at the bottom.
Let me direct your attention to the table at the bottom.
![]() This table tells us which units the Spearman is especially effective against.
This table tells us which units the Spearman is especially effective against.
![]() Oh no... it says that they're effective against Cavalry!
Oh no... it says that they're effective against Cavalry!
![]() Yes, Spearmen will deal extra damage against units such as our Knight.
Yes, Spearmen will deal extra damage against units such as our Knight.
![]() Go ahead anc close this window when you're ready.
Go ahead anc close this window when you're ready.
- (Close unit info)
![]() We should make sure not to put our Knight in any unnecessary danger.
We should make sure not to put our Knight in any unnecessary danger.
![]() This would be a good time to check the enemy's movement range.
This would be a good time to check the enemy's movement range.
- (Select Dreadspear)
![]() By holding this button, you can display how far the selected unit can move.
By holding this button, you can display how far the selected unit can move.
![]() Awareness of the enemy's range is important when positioning your units.
Awareness of the enemy's range is important when positioning your units.
![]() I should keep the Knight out of reach of the Dreadspear.
I should keep the Knight out of reach of the Dreadspear.
Start of Mercia's turn 4
![]() Hmm... This part of Cherrystone is more forested than I remember.
Hmm... This part of Cherrystone is more forested than I remember.
![]() We may be able to use this to our advantage!
We may be able to use this to our advantage!
![]() Different terrain types have different advantages and disadvantages.
Different terrain types have different advantages and disadvantages.
![]() You may have noticed that travelling through a forest will slow you down.
You may have noticed that travelling through a forest will slow you down.
![]() Now that you mention it, I also noticed that units struggle with mountains!
Now that you mention it, I also noticed that units struggle with mountains!
![]() Additionally, some terrain will increase or decrease the defence of a unit.
Additionally, some terrain will increase or decrease the defence of a unit.
![]() Forests will give you a boost in defence, while rivers will make you vulnerable.
Forests will give you a boost in defence, while rivers will make you vulnerable.
![]() You can read more about each terrain type by cheking its Tile Info.
You can read more about each terrain type by cheking its Tile Info.
Defeating the Western village
![]() ...You won't get it back without a fight.
...You won't get it back without a fight.
Defeating first enemy Soldier
![]() If you surrender, we can just end this now. We don't have to keep fighting.
If you surrender, we can just end this now. We don't have to keep fighting.
Defeating enemy Barracks
![]() Great! Ragna can no longer recruit soldiers!
Great! Ragna can no longer recruit soldiers!
![]() Now's the time! Let's take her down!
Now's the time! Let's take her down!
Defeating either Ragna or her Stronghold
Mercia is defeated
![]() HAHA! You thought you could defeat me?!
HAHA! You thought you could defeat me?!
![]() I should focus more on Critical Hits. They really turn the tide of battle...
I should focus more on Critical Hits. They really turn the tide of battle...